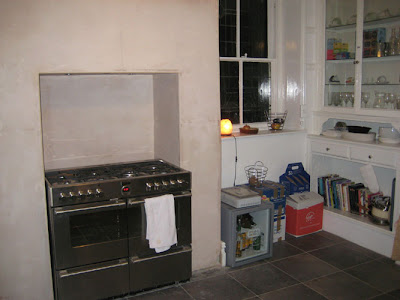
Prior to us getting the house they had a smart kitchen (see below) with a range cooker up against the chimney breast. Of course, all of this disappeared during repossession. Well all apart from the floor in which there are now just a few holes that show what the kitchen once was! We decided so that we had room for an island (or more room for the island) to knock out the chimney breast and make use of this space by sinking the cooker into it...
 Here it is part way through (see below). Although the hole for the cooker is relatively small the amount of rubble that was produced seemed to be way too much to have fitted in the hole. I think th'husband singlehandedly took 2 x pick up loads to the dump.
Denise, had you witnessed it, you would no doubt have been impressed at this display of manliness. It had the same effect on me as Jason fixing your video recorder had on you all those years ago! As you can see from his attire Jason is taking an office based site foreman type roll on the knocking down and rebuilding part of the project rather than being hands on....here he is staring at the wall as he is want to do when there is work to be done! And here it is plastered. I am referring to the cooker not th'husband! See it fits...amazing!
 And here it is again in context with that part of the kitchen. The plaster has dried out nicely. Yes, there are a few boxes still to find homes as you can see!
 Oh and here it is painted and by night.....looks a bit alien doesn't it? I think it is the futuristic element or the combination of shiny-ness, lots of buttons and a digital display that means every bloke that visits comments on the cooker. The irony being I am not sure many of them would actually have a clue how to use it.... (Kit - you are the obvious exception to this statement and we look forward to you using it for cake baking in the near future - I will warn you, it is gas!)
 As with the fireplace in the living room, there are still some joinery bits to do and floor tiles to clean (how does one remove concrete from slate tiles?) so finished photos to follow.
Hours taken: again a fair few to find the cooker and a fair few more to purchase it. Yes, I have a husband that likes to research to make sure that 1) we have bought the best possible product for our needs and 2) you can't buy it for 5p cheaper elsewhere. A week (on and off) to knock out chimney breast, re-fit gas pipes, fit lights, hook up electrics and a few hours painting!


